top of page

Roy W7YRV/SK developed the X Rhombic

Writer: skylarkcolo
skylarkcolo
Apr 23, 2024
12 min read

Updated: 3 days ago

From Roy's web site

The late Roy Callison of Bisbee, AZ, ham call W7YRV/SK had nine X Rhombics arrays, which he developed, he had one for every 20 degrees. That was a truly remarkable accomplishment for an amateur station (You must see his page, great info w7yrv.blogspot.com/2013/). It was an extreme pleasure for K0UO to meet Roy, even in his 90's, he was still an encyclopedia of knowledge when it comes to very high gain antennas.


K0UO is very privileged that W7YRV has entrusted him with the schematics, drawing, and photos of these fabulous antennas. Infact K0UO has setup and tested the design at the RSI Corp outdoor test range, see below.


a view of the Walz Ranch in the Red Guy Hill is KS  using a X-Rhombic Small Scale test setup at the K0UO site
X-Rhombic Small Scale Test Setup at the K0UO site 2 in the Red Gyp Hill of KS, As of Aug 2026 A full size X-Rhombic system is now underway at K0UO Site #2

K0UO's Curtain Array with Distributed-fed is using the W7YRV "X" rhombics design and parts. It is a traveling wave antenna, which is a non resonant traveling wane antenna. The rhombic antenna can radiate at elevation angles close to the horizon, and is called a Traveling wave or a Leaky-Wave Antenna (rhombics are fast wave), with a phase velocity greater than the speed of light. This type of RF wave radiates continuously along its length, and hence the propagation wave=number kz is complex, consisting of both a phase and an attenuation constant. A highly directive beams at an arbitrary specified angle can be achieved with this type of antenna, with a low side-lobe levels. The phase constant of the wave controls the beam angle (and this can be varied changing the frequency, while the attenuation constant α controls the beamwidth. The aperture distribution can also be easily tapered to control the side-lobe level or beam shape. Leaky-wave antennas can be divided into two important categories, uniform and periodic, depending on the type of guiding wire cable structure.


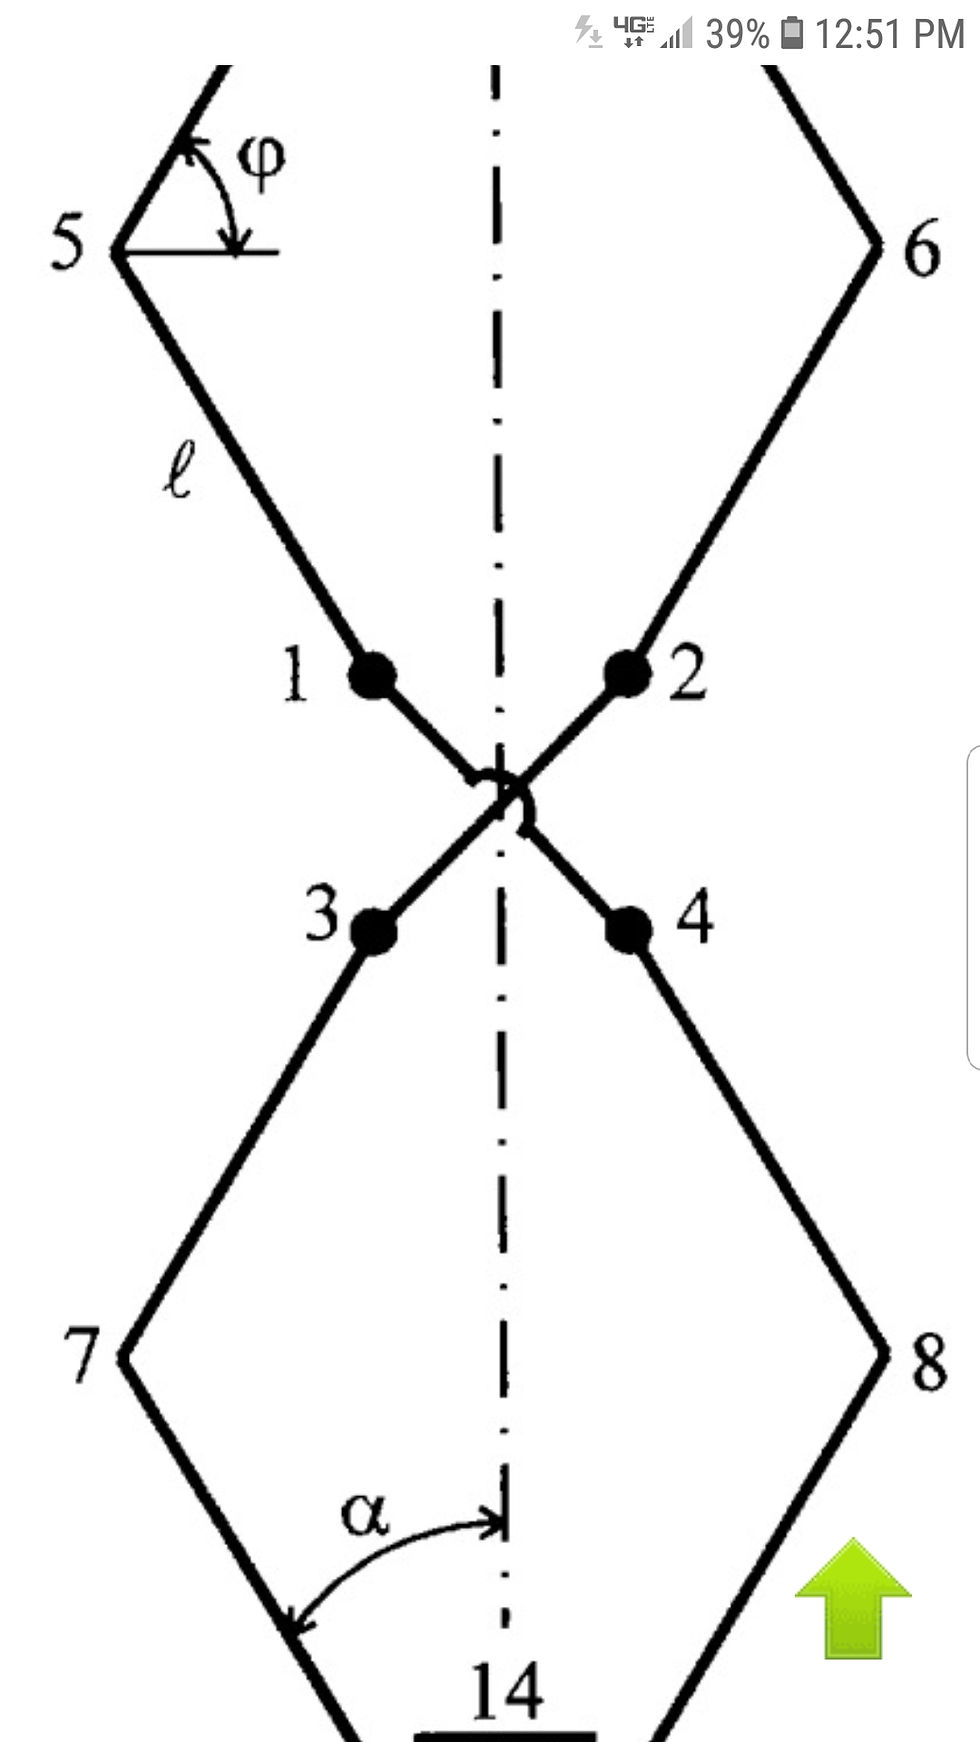
To build an X-Rhombic antenna, you must alter the standard diamond layout by crossing the wire elements at the side apices. This phase-reversal layout sharpens the main forward beam and suppresses side lobes.

Because it is a multi-wavelength traveling-wave antenna, it requires substantial physical space and highly sturdy support structures.


Nine rhombics antennas (reconfigured)

Roy Callison of Bisbee, AZ, W7YRV/SK Three 1100 foot long rhombics 120' high and the control relays giving you six direction. I used these antennas for about 18 months until I figured out how to put 9 of them on my 40 acres. This were the largest antenna since W6AM had is farm, from the late 1940s through the 1980s.

Hand-drawn electrical switching diagram on paper for the X Rhombic array, labeled NW, NE, W, E, SE, SW, with arrows, X marks, and circuit connections. used by K0UO
The late Roy Callison of Bisbee, AZ, ham call W7YRV/SK had nine X Rhombics arrays for HF 1100 foot long at 120 foot high, K0UO is still using some of Roy's hardware and parts from his site.

The X-Rhombic modifies the physical structure of a standard diamond loop by crossing the wire elements at the side corners rather than leaving them as flat angles. This specific, altered layout forces the traveling RF current to undergo spatial phase adjustments as it moves down the wire. Experienced antenna designers use the X-Rhombic layout to suppress unwanted side lobes even further and force more energy into a tighter, cleaner main forward beam than a standard flat rhombic can manage.


X-Rhombic: A full rhombic loop where the side wires cross or split into an "X" configuration at the side apices.An advanced cross-phased geometry modification of a standard rhombic, not a fraction of one.

To construct an X-Rhombic antenna, you need to modify the traditional diamond configuration by intersecting the wire elements at the side vertices. This phase-reversal design enhances the main forward beam and reduces side lobes.


Step 1: Calculate the Dimensions

Rhombic dimensions are dictated by your lowest target operating frequency. For high gain, each leg should be at least 2 to 4 wavelengths long (λ).

  1. Calculate Wavelength (λ):

  2. Leg Length (L): Multiply λ by your chosen factor (e.g., 3λ or 4λ).

  3. Tilt Angle (φ): The internal apex angle typically ranges between 50° and 70°, depending heavily on the leg length to align the wire radiation lobes cleanly with the center axis.

Step 2: Lay Out the Geometric Footprint

An X-Rhombic requires four tall support masts (utility poles or trees) arranged in a precise diamond shape on flat terrain.

  • The Center Axis: A straight line from the input mast to the termination mast.

  • The Side Masts: Perpendicular to the center axis, defining the width of the array.

  • The "X" Crossings: Instead of routing the wires directly around the side masts like a standard rhombic, the wires cross over each other at the side positions. They must be insulated from one another at the crossover point using a heavy-duty ceramic or fiberglass spacer.

Step 3: Wire Routing and Insulation

High-tensile, copper-clad steel wire (such as #12 or #14 AWG or wire rope) is highly recommended to withstand the mechanical tension across long spans.

  • Input End: Secure two separate wires to the input mast insulators.

  • The Crossover: Run Wire A from the input mast toward Side Mast 1. Run Wire B toward Side Mast 2. At the mid-point (the side apex position), cross the wires past each other using the non-conductive spacer, anchoring the spacer assembly securely to the side masts via guy lines.

  • Termination End: Continue routing the wires down to the far termination mast, completing the elongated diamond envelope. or use K0UO system of rephasing the power.

Step 4: Construct the Feed and Termination System

Because it is a traveling-wave system, it must be terminated correctly to remain unidirectional.

  • The Feedpoint: Connect a balanced, high-impedance open-wire transmission line (typically 600-ohm ladder line) to the input wires. Wire this into a high-power 12:1 or 4:1 current balun at ground level before running coaxial cable back to your transmitter.

  • The Termination Resistor: At the far apex, connect a 600 to 800-ohm non-inductive resistor. This resistor must be rated to handle roughly half of your transmitter’s total output power, as the remaining forward RF energy is dissipated as heat to maintain the sharp forward beam pattern. or use the K0UO rephasing system for 90% efficiency

  • Traditional rhombic antennas are known for their simplicity and high gain over a wide bandwidth, but they require large physical space due to their long wire elements with lower efficiency. The re-entrant rhombic array addresses this limitation with several unique features:

    • Improved Bandwidth: The re-entrant structure can support a wider frequency range due to the increased electrical length and better impedance characteristics.

    • Enhanced Directivity: The shape modification focuses the radiation pattern more tightly, improving directivity and reducing side lobes.

    • Enhanced Efficiency: The design reduces losses due to reflections and mismatches, resulting in increased radiation efficiency and redirecting the power previously lost in termination back into the array, now up to 90% efficient.


    These features differentiate K0UO re-entrant rhombic arrays from traditional wire antennas and other directional antennas like Yagi or log-periodic arrays.


a view of the old large rhombic site of the late Roy W7YRV/SK  in the 1990s taken by K0UO
Roy's ham radio transmission site in a desert landscape, featuring multiple tall antennas


Roy's four home built 200 foot towers


Handwritten antenna schematic for the X -Rhombic array with radial wire diagram, switch matrices, and notes on a reconfigured rhombic, on white paper, as now used by K0UO at site # 2.
Diagram of the W7YRV Reconfigured Rhombic Antenna System, detailing leg grounding, directional control, and gain specifications. The antenna is shown at a height of 65 feet with 600-foot legs.

Roy said: "This is the relay control box that takes the power to one end of the rhombic antenna and then brings back the reflected power to the shack to be terminated making the antenna transmit only in one direction. The four deck wafer switch allows me to select any of the six directions". K0UO has this control box and it is in use at the K0UO station today on the phased X-Rhombic Curtain


Nine  rhombics antennas reconfigured. Roy said::"You cut a diamond shaped rhombic in half, and then put it back together in the form of an X, and feed it in the center, now you have  electrically the same antenna. These rotating  rhombics change directions in 20 degree steps, and they cover all bands from 160 through 10 meters.  The apex angle can be adjusted from 40 degrees on the high bands to 120 degrees for the  low band. Of all the antennas I have built, this was the best all around antenna.  If I had to do it over again, I would have made them 120 feet high to get a little lower angle of radiation, but at 65 feet it was a super  great performer.  When I started building 197 foot towers for the 80 meter sterba curtains, the center tower of this antenna system was in the way, so although it grieved me to remove it, I knew that if the 80-meter antenna system didn’t work out, it would be no big deal to rebuild it."

X Rhombic on a Tall 200 foot  black antenna tower with radial spokes at the top against a clear blue sky
X Rhombic, all the feed line going to the top of the tower later he moved the relay box to the top of the tower

The 600-ohm transmission line goes to the relay control box that is connected directly to the antenna system. 


Above, 120' feet of 3 inch pipe, to be a tower for the 20 meter sterba curtain. The 50 foot triangular tower section on the truck has the 120' tower wired to it, in order to keep the ends of the pipe off the ground.

The reconfigured rhombic antenna system with the transmission lines coming down to ground level. Ever thing worked very well, so later we moved the relay box to the top of the tower


Below,This is a 40' gin pole pulling up a 65' rhombic tower.


Pickup truck in a desert field beside a tall angled metal tower and wire, with blue sky and distant mountains.
GIN POLE setup that Roy used to raise the towers he built
Gmail email from Roy Callison to Steve Walz K0UO, with a long message about antenna parts, illness, and call info, plus View details.
An email from Roy (Ham W7YRV) to Steve Walz some of the parts used for K0UO Rhombic Historic Preservation

BELOW:

Roy Said:

"This is a Gila monster that I almost stepped on.  I heard a loud hiss, and I jumped a few feet, at first; I thought it was a rattlesnake. I just had to get a picture of him, because you almost never see one in the daytime".

Gila monster
Gila monster


Hands hold a homemade electronic control box with a large knob, toggle switch, and handwritten angle labels in a cluttered workshop. for the X Rhombic, K0UO is using it now in KS
Roy showing K0UO the direction control box in 2019, with a 9-position switch that lights up four lights on each of the 9 antennas showing you the direction and apex of the X Rhombic antenna.  

It, looks complicated but its not, each deck is for a different apex.


Hands hold a homemade electronic control box with a large knob, toggle switch, and handwritten angle labels in a cluttered workshop. for the X Rhombic, K0UO is using it now in KS
Photo taken in 2019 by Steve Walz K0UO while at Roy's site.

Hands hold a homemade electronic control box with a large knob, toggle switch, and handwritten angle labels in a cluttered workshop. for the X Rhombic, K0UO is using it now in KS

 Below, This is the relay switching box at the base of the tower 

X Rhombic control box still used by K0UO in KS
This box is still used by K0UO "I hope others will carry on the tradition, and art of the large Rhombic Arrays in the future".

X Rhombic control box still used by K0UO in KS
K0UO is now using Roy's box at the K0UO Rhombic Farm

 The transmission lines coming down to the relay box. The antennas performed great with the relay box at ground level,  a look inside the relay box.  The wires seem to be going everywhere. You might think you could have an impedance problem, but it was not apparent.

"Don't underestimate the performance of the Rhombic, unless you've personally built and used one. Because of their excessive size (area) covering many acres, you see their real advantage of thousands of feet of wire in the air, which creates receive signal diversity, by capturing signals at different times and different angles, vastly eliminating fading QSB, and firing out the transmitted RF in the same way. Traveling wave antennas are very unique and unlike many other antenna in common use."


 Posted by Roy at 8:41 AM

The feed-point for the X Rhombic feedline around the 200 foot tower to feed at the bottom Metal tower with hanging wires in a dry desert landscape under a clear blue sky, with sparse shrubs and a muted, quiet feel.
The feed-point for the X Rhombic feedline around the 120 foot tower to feed at the bottom

drawing of a USSR  X Rhombic as used in the USSR in the 1950-1980s
A type of X Rhombic as used in the USSR in the 1950-1980s, this came from a ham who worked with Григорий Захарович Айзенберr

USSR

Grigory Zakharovich Ayzenberg (Григорий Захарович Айзенберг, 1904–1994) was a monumental figure in Soviet radio physics and the chief architect behind the USSR’s global shortwave and military antenna infrastructure.

The Prolific Author: He held 53 Soviet author certificates (patents) and published over 60 core scientific works. His definitive textbook series, including "Shortwave Antennas" (Коротковолновые антенны) and "Ultra-Shortwave Antennas" (Антенны ультракоротких волн), became the definitive guides for Soviet communications engineers. 

Mastering Traveling-Wave Antennas: While Western designers concentrated on resonant aluminum beams (such as Yagis), Ayzenberg excelled in wire arrays utilizing traveling waves (Rhombics, V-Beams, and Fishbone arrays). He developed the shift from single-wire systems to multi-wire "curtain" configurations to reduce high-impedance loads, stabilize SWR, and expand operating bandwidths.  He also desiged a double horizontal rhombic, it looks kike a half of a X-Rhombic (the X design is normally twice as long as jsute on of the two double one, so they use the some number of wavelengths ).

drawing of the double horizontal rhombic
The USSR double horizontal rhombic also uses a cross-phased geometry, you must feed both diamond loops in phase while matching the structural impedance. The two main configurations for feeding dual loops are parallel-fed (coplanar/side-by-side) or stacked (vertical broadside).

Double horizontal rhombic

1. Parallel Feed Method (Side-by-Side Arrangement)

When two horizontal rhombics are placed side-by-side, they share a central axis.

  • The Common Junction: The main open-wire feed line routes directly to a central common junction.

  • Phasing Lines: Two balanced transmission lines of identical length split from the common junction to the input apex of Loop 1 and Loop 2. Identical lengths are mandatory to keep the signals perfectly in phase.

  • Impedance Matching: Because the two matching loops run in parallel, their combined input impedance is halved. A phasing and matching stub or impedance transformer (balun) handles the transition to your main feed line

    .

2. Series Feed Method (Stacked Arrangement)

When loops are vertically stacked on top of each other, they can be wired in series to maintain high input impedance.

  • The Main Feed: Connected directly to the lower loop apex.

  • Interconnecting Jumpers: Phased jumper lines run vertically up from the lower apex to feed the upper apex.

Crucial Termination Requirement

A true unidirectional system requires termination at the opposite end of the feed point. If the termination is missing, the antenna becomes bidirectional and loses its high forward directivity.

  • A non-inductive 600 to 800-ohm resistor must span across the far apex of each rhombus loop.

  • Alternatively, a dissipating open-wire transmission line can run back to a ground-level resistor block.


1. The Core Architecture: Cross-Phased Geometry

A standard planar rhombic consists of two V-shaped long-wire antennas connected end-to-end to form a single flat diamond. The X-Rhombic fundamentally shifts the wire layout:

  • Instead of running parallel or flat, the elements are deliberately crossed or split into an X-configuration at the side apices, or the array features two interconnected, overlapping rhombic structures driven by a unified feeding network.

  • The structure effectively forms a multi-tier or intersecting spatial loop. By doing this, the RF current does not just transition linearly down a simple diamond; it undergoes an instantaneous spatial phase adjustment mid-flight down the array's length.

2. Eliminating the "Height-to-Wavelength" Trap

The fatal flaw of any standard horizontal rhombic is that its vertical takeoff angle (elevation angle) is rigidly bound to its physical height above the ground plane ($h/\lambda$).

  • If the ionosphere shifts (e.g., from day to night) and requires a significantly lower or higher takeoff angle to sustain the circuit, a standard flat rhombic's gain plummets because its physical height cannot change.

  • The Soviet Solution: The X-Rhombic introduced a form of vertical taper or spatial diversity. Because sections of the "X" configuration occupied different vertical planes or variable sloping angles relative to the ground, the antenna naturally generated a composite wave that desensitized the array to strict ground-reflection height constraints. This gave the Soviet military and international broadcast networks a stable, low takeoff angle across a vastly wider frequency matrix without moving the physical masts.

3. Radical Sidelobe Damping

When driving hundreds of kilowatts into a long-wire array, parasitic sidelobes waste massive amounts of power and cause destructive intercept vulnerabilities.

  • Ayzenberg mathematically calculated that by crossing the wire paths in an "X" configuration, the radiation fields of the unwanted minor side-lobes generated by the front half of the antenna were precisely $180^\circ$ out of phase with the sidelobes generated by the rear half.

  • This caused destructive phase cancellation for almost all off-axis radiation. The resulting main forward beam was incredibly pure, dramatically increasing the front-to-side and front-to-back ratios compared to a standard Bruce rhombic.

4. Maximizing Tower Efficiency (The Economy of Scale)

In the punishing Soviet interior, erecting heavy, guyed steel masts was a massive logistical and financial strain. Engineers could not easily afford to build a brand new 4-tower footprint for every single target frequency or direction.

  • The X-Rhombic geometry allowed for interlacing and stacking. Engineers could suspend an X-shaped configuration within the exact same physical footprint of an existing array, utilizing the same side masts.

  • By feeding the X-array in parallel or implementing a branched delay network, a single installation could perform the work of multiple independent antennas. This configuration allowed the USSR to maintain highly directional, high-gain links to distant targets like Cuba, North America, and Southeast Asia using a heavily optimized footprint.


Radio Astronomy: Australia's Dapto Field Station operated orthogonal crossed-rhombic aerials in the 40–240 MHz range for solar radiospectrograph observations and tracking solar flare bursts. 


Roy's Blog, 2 comments:

  1. K0UOJune 25, 2018 at 10:17 AM I talked to you a few years ago after I got my rhombic system working here in Kansas I really appreciate design information you have on the your old system. I especially like the feeding from the center X design rhombic I wished I could have thought of that before I installed these three big ones here in Kansas that I have. Reply

  2. K0UOApril 30, 2019 at 6:44 PM I JUST WANTED TO SAY, THANK YOU ROY. After meeting you in Jan 2019, I have been able to use your X Rhombic design to build a Distributed-fed Curtain by stacking two X-Rhombics at 190 foot, and 100 foot ,and it is a steerable design. The antenna is also using Roy's old outside control-box (rebuilt) that you see in this blog. Reply. W7YRV lives on, at the K0UO large antenna farm.


SEE THE "X RHOMBIC" USED AS A CURTAIN ARRAY 20db on 40 meters


SEE ALL BLOGS Here, & Just Skip the first few pages, and go to the Blog List


1 Comment

Rated 0 out of 5 stars.
No ratings yet

Add a rating
Guest
Jun 14, 2025
Rated 5 out of 5 stars.

I guess you can say go big or go home after looking at all this.

There'll be a time when the military wish they hadn't took all their big antenna Farms down

Like

K0UO Rhombic Antenna Farm

K0UO Rhombic antenna Farm

17353 SE U.S. Hwy 281
Kiowa, KS 67070

  • Facebook
  • Twitter
  • LinkedIn

©2019 by Steve E Walz. Proudly created with Wix.com

bottom of page